How to Make Hooks or Hangers From Soda Bottles

8 Jun

After the complete tedium of the no go fabric/ plastic rugs, I needed a quick and easy for my soul to regain the feeling of accomplishment and control.

I had been saving plastic bottles for another project I had in mind, but since we have a collection center for plastic bottles near by, and they really are easy to come by in largish quantities, I decided to sacrifice 6 of them for my quick and easy.

 The concept is  the same as with my tuna can hooks  except it is even faster and easier to do, and it has the added advantage of permanently removing some of the never-played-with little knick-knacks off the ever growing pile of toys on the floor.  No doubt and all around win-win situation.

This slideshow requires JavaScript.

 Making them is very easy. Just cut of the top of the bottle, leaving at least 2 inches and a tab you can use to hang it from, with a screw or nail, (depending what you will be using them for), Collect all the knick- knacks you need and go wild.

 A few points to ponder:

 Design wise the sky is the limit.

Because of the star shaped bottom most soda bottles have, it is a bit hard to see the details of the design face on. Make sure the sides look good too.

The deeper you make it, the easier it will be to hang stuff on it. As opposed to the tuna cans, the edges on the bottles are curved, so for some things to hang well and not slip off you might need some depth.

I don’t expect these to last as long as the tuna can hooks. Plastic is softer and weaker and it will probably break if abused to much.

I don’t think that that is necessarily a bad thing when it comes to décor in kids rooms.

Anyway, the kids love them, and I love the fact that they were quick and easy, with both a start and a finish.

איך להכין מתלים מבקבוקים

8 Jun

אחרי הייאוש והמאוס של השטיחים הנצחיים הייתי צריכה משהו קל ומהיר להשקיט ולהרוות בו את נפשי הבלתי מסופקת.

כבר כמה זמן אני מבשלת בראש פרויקט מבקבוקים, אבל היות וגם הוא היה אמור להיות ארוך ומרובה עבודה וחומר, החלטתי לקחת שישה מהבקבוקים לטובת המהיר והקל שלי.

 הקונספט לא חדש ועובד באותה הצורה בו מתלי הטונה עובדים. זאת ועוד: הוא הרבה יותר מהיר וקל ממתלי הונה ובעל ערך מוסף בזה שהוא גם מסיר מערמת הצעצועים ההולכת וגדלה על ריצפת חדר המשחקים את אותם צעצועים קטנים וחסרי תועלת, אשר חוץ מלהוסיף גובה לערמה האמורה  תרומתם לביתנו אפסית.

 כדי להכין אותם מורידים מהבקבוק את חלקו העליון כך שיישאר לו גובה של לפחות חמישה סנטימטרים (אם לא יותר).  יש להשאיר גם לשונית כדי להעביר דרכו את הבורג או המסמר. איפסו את כל הקשקושים  הדרושים וגשו לעבודה עם דבק חם. תתפרעו.


This slideshow requires JavaScript.

כמה נקודות למחשבה:

האפשרויות העצוביות כאן בלתי מוגבלות.

בגלל שתחתית הבקבוקים בדרך כלל לא שטוחה, קשה קצת לראות את מה שמתרחש בפנים מלפנים. וודאו שגם הצדדים נראים טוב.

ככל שתשאירו יותר גובה, כך תוכלו לתלות עליו יותר דברים בקלות. (בגלל הקצה המעוגל דברים יפלו ממנו אם לא יהיה מספיק עומק)

אני לא מצפה שמתלים אלא יחזיקו מעמד לאורך זמן. הפלסטיק רך ועדין. אני גם לא חושבת שזה דבר רע כשזה מגיע לעיצוב בחדרי ילדים. בכל מקרה, הילדים מתים עליהם  ואני מתה על העודה שהייתה להם התחלה וגם סוף!

When Trash Becomes Treasure, or Supply and Demand

31 May upholstery detail

Its been a while since I put pen to paper (literally). In fact, other than the odd check or weekly supermarket lists, its been years.

It will probably happen with greater frequency over the course of the summer as I sit by the pool, amidst the screams and splashes of joyous kids, while my kids frolic in the water.

I haven’t written a post in quite a while, not because I have been slacking, on the contrary. The pile of unfinished projects in the corner of the studio is growing just as fast as the materials needed to complete them is dwindling, once again proving the point that the value we assign objects is subjective and subject to change at any given moment.

One moment they are shopping bags stuffed listlessly, and guiltily under the sink and in the next they are a valuable material that has been totally used up, every last one pull out of every nook and cranny in the house, and I still find myself about 500 short of completing the carpet. Into the corner goes the half finished carpet and while I wait for the bags to multiply once again and out come the chairs from my old shop that I need to reupholster, and the pile of jeans I intend to use to do so. Once again the amount of jeans I had set aside for the project fell just short of what I needed to complete the fabric for the chairs, and they too joined the pile in the corner.

 upholstery detail

Out came to old, torn, ugly sheets, soon to be place mats and carpets and once again, all to soon they find themselves half finished in the corner.

detail sheet carpet

I have been upcycling quite intensively for just over 6 months now, and something needs to change in the way I am working. I need to find a way to source materials in decent quantities, for free, so that I can work a project, or a series from beginning to end without having to wait till I grow to fat or to thin for my current pairs of jeans. It would be wonderful if all of this could happen for free.

דברים שלא ידעתי על ביקוש והיצע

31 May Jean upholstery

מזמן לא כתבתי עם עט על דף, למעט רשימות לסופר.

נראה לי, שבמהלך הקיץ זה יקרה קצת יותר ממה שזה קרה בשנים האחרונות לאור הצורך לשבת ליד הבריכה, בין הילדים הצווחים וצורחים משמחה כדי לשמח את ילדיי.

לא רשמתי כאן מילה וחצי מילה הרבה זמן ולא כי התבטלתי.  אני דווקא עסוקה מאוד וערמת הפרויקטים החצי גמורים הולכת ותופחת בפינת הסטודיו, בזמן שערמת שהחומרים שאני צריכה ונגמרים לי, הולכת וגדלה לצידה.

דבר המוכיח שוב את הנקודה שהערך שאנחנו מעניקים לדברים מאוד סובייקטיבית ועשויה להשתנות בכל רגע נתון. רגע אחד אלה שקיות מהסופר, דחוסות בחוסר מעש, מוצפות רגשות אשם מתחת לכיור וברגע הבא הן חומר גלם יקר מפז שנוצל עד תום, מושו מכל פינות הבית ועדיין חסרות לפחות 500 עד סיום השטיח.

 בזמן שאני מחכה שהזהב  הזה יגדל ויתעצם שוב מתחת לכיור,  אני פוצחת בפרויקט שכבר מזמן בתכנון, של חידוש ריפוד הכיסאות שפעם איישו לי את החנות. ערמות הג’ינסים הישנים שצברתי לצרוך העניין נגמרו לי שנייה לפני שסיימתי להכין את כל הבד לריפוד. גם אותן צירפתי לערמה, לאחר כבוד.

 Jean upholstery

נשלפו הסדינים הישנים מהארון וגם כאן היחס שלי כלפיהן השתנה מיד. כבר לא סדינים ישנים/קרועים/מכוערים אלא שטיחים ופלסמטים פוטנציאליים. אך גם הן לא הספיקו למלא את יעודן ורבע שטיח אומלל הצטרף לפינה.

Detail of sheet carpet

קצת מעל חצי שנה שאני במשחק אינטנסיבי בזהב החדש שלי, ונראה לי, שבקרוב אצטרך לשנות פאזה. ברור שגם אם אצלי בבית הסדינים נגמרו, בחוץ מסתובבים הרבה סדינים בלויים, ישנים ובלתי רצויים. עכשיו האתגר יהיה למצוא דרכים לכנס אותם אצלי, בכמות ובמידה שמספיקים לי כדי שאוכל לסיים פרויקט מתחילתו ועד סופו ואולי לעשות סידרה של פרויקטים באותו הטכניקה או באותו החומר.

הכי נחמד יהיה עם כל זה ימשיך לא לעלות לי דבר.

אם משהו מכיר דרכים להתחבר למקרות חינמיים של כל מני חומרים, החל מבדים וכלה בשקיות – אשמח מאוד  למידע.

Cause and Result – Solar Cake!

13 May

 Well what do you know! The cake I was waiting on when I was writing the previous post did bake and was devoured before I could say Jack Robinson!

 OK, I said Jack Robinson many times before the cake was ready, but once it was it didn’t last long.

 On Friday night I went to bed knowing that first thing Saturday morning I would be putting the solar oven together and making my first sun cooked dish ever. I couldn’t decide what I wanted to make…. I love slow cooked stews and pot roasts, but as a novice I am still a little weary of cooking meat in the oven, although it is done all over the world, and the internet is full of recipes to prove it.

Anyway, I woke up on Saturday, not very bright and not very early, at 0900, which is quite late for me, especially if I need to get an unknown dish ready to go….

Due to my dwindling pantry contents , I had no choice but to make a cake.

 I had one technical problem I hadn’t solved yet, and that was the question of the pot lid.

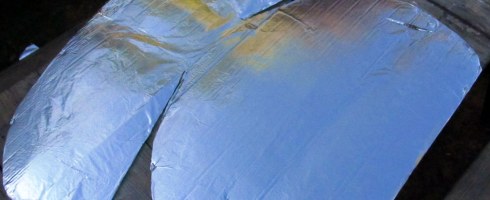
In a solar oven, while the foil reflects the heat and light of the sun, the pot  in needs to be black so that it can trap the heat, and not reflect it back to the foil like a white or steel colored pot would do. I do have an old black pot, but it doesn’t have a lid, so I usually use a lid from a white pot I have which is of a similar size.

This wouldn’t do today, so I had to improvise a lid out of the bottom of an adjustable baking pan.

 I think that this had some effect on the time it took for my cake to bake, but more on that later.


This slideshow requires JavaScript.

Anyway, I made my batter, and chose a spot in the garden where shade falls latest in the day, and positioned my ‘cookit’ on the cart I had previously used for my seedlings, (Life has a way of working out like that. If I had made the oven earlier, I wouldn’t have been able to use this cart, which conveniently has wheels on it.) making sure the longest shadow it created was directly behind it. I wasn’t quite sure what angle to position the lower front flap. So I just let it do what came natural, and I think that also had an effect on the length of time it took for the cake to bake.

In the pdf from solar cooking.org, it says  it should take about double the time to cook any thing in the solar cooker, so I estimated, since this cake takes about 45-50 minutes in the oven, it would take at least 2 hours in the cookit, if not more.

I started it at 1050, and at about 1300 took a look to see how it was doing. There was condensation on the inside of the plastic bag in which the pot sits, effectively acting as a heat trap, and the pot was very hot to the touch, both good signs, but the cake was not done. I could see that something was happening, because it had bubbles on the top, so it was obviously rising. An hour later it peeped again (and when I say peep – I mean peep…just lift the lid slightly, peep quickly and close it all up again) it looked like nothing had changed. I am sorry that I didn’t touch the surface with my finger to see how it felt – if it was more viscous than it was when I first started baking it.

To pass the time, I decided a siesta was in order, and at about 1500, I woke up and went to see if I could have some cake with my coffee, and it turns out that I could!!

It had turned to a lovely golden brown, and was obviously ready (this time I did check with my finger.)

When I bake a cake in the oven, a thin crust forms on the top when it is ready, and the middle is higher than the edges. In this case, there was no crust at all, and it seemed to have risen evenly, except for the fact that the pot it was in had been sitting on a slant, so the cake came out slanted as well.

Did I get to eat it with my coffee? No, not quite. It got devoured by R and the Kids before the kettle had time to boil! (Yes, they did have lunch! It was just that good J)

תוצרת התנור הסולארי – עוגת שמש

13 May

מה אתם יודעים! העוגה לה חיכיתי כשכתבתי את הפוסט הקודם הצליחה, ונאכלה כולה לפני שהספקתי להגיד ג’ק רובינסון.

 לעומת זאת, הצלחתי להגיד ג’ק רובינסון המון פעמים עד שהעוגה נאפתה.

 ביום שישי הלכתי לישון בידיעה שהדבר הראשון שאעשה בשבת יהיה להכין תבשיל שהוא בתנור הסולארי. העובדה שלא ידעתי מה אכין הטרידה את שנתי. אני מאוד אוהבת תבשילי קדירה ולמרות שבכל העולם מבשלים בשר בתנורים סולאריים, אני עדיין לא סומכת מספיק על התהליך כדי שאהיה מוכנה לבשל כך בשר.

 בכל מקרה, בשבת בבוקר, התעוררתי מעט מאוחר, בערך בתשע, בדקתי מה יש ומה אין במקרר ובמזווה והגעת למסקנה שאין מנוס אלא להכין עוגה.

 נשארה לי עוד סוגיה אחת טכנית לפתור, והיא המכסה לסיר. הסיר בו משתמשים בתנור הסולארי חייב להיות שחור על מנת לספוג את החום המוקרן אליו מדפנות התנור. לי יש סיר שחור אך הוא חסר מכסה. כשאני מבשלת בו על הכיריים, אני משתמשת במכסה לבן מסיר בגודל דומה, אבל פה זה לא היה עובד.

לכן אלתרתי מכסה מתחתית של תבנית אפייה שחורה. התאום לא הייה מדויק ובטח לא אטום ויש לי תחושה שזה השפיע מעט על זמני האפייה.


This slideshow requires JavaScript.

בכל מקרה, הכנתי את הבלילה ובחרתי מקום בגינה אליו הצל מגיע מאוחר ביום, והנחתי את התנור על העגלה שקודם לכן אוכלסה על ידי השתילים שלי שרק יום קודם גמרתי להעביר לגינה, ודאגתי שהצל שהוא יוצר יהיה בדיוק מאחוריו.

לא היית בטוחה בדיוק באיזה זווית לסדר את הכנף הקדמי, אז נתתי לו להסתדר לבד וגם לזה, אני בטוחה, הייתה השפעה על זמני הבישול.

באתר של solarcooking כתוב שזמני ההכנה מכפילים את עצמם לפחות, והיו והעוגה שהכנתי מוכנה תוך 45-50 דקות בתנור רגיל, החלטתי שבערך ב1300 שעתיים אחרי שהתחלתי, אבדוק לראות מה קורה.

אכן ב1300 בדקתי. בתוך השקית בה מונח הסיר, המשמשת גם כמעין כיס חום היו הרבה אדים והסיר עצמו היה מאוד חם למגע, שני סימנים מעודדים, אבל העוגה עוד לא הייתה מוכנה. ראיתי שהיא בתהליך של אפייה – היו בועות קטנות על פני השטח אבל ברור היה שזה עוד לא מוכן.

בשתיים בערך בדקתי שוב ולא נראה שהרבה השתנה. תנור סולארי או לא שנת צהריים בשבת זה חובה וכשקמתי משנתי הענוגה, לאחר שעה, העוגה כבר הייתה זהובה ומוכנה!

כשאני אופה עוגה בתנור, בד”כ למעלה נוצר קרום דק, ואמצע העוגה עולה גבוה יותר משאר העוגה. כאן זה לא קרה.

לא היה קרום והעוגה עלתה בצורה אחידה (אם מתעלמים מהעובדה שכנראה הסיר ישב באלכסון קל והעוגה אלכסונית בהתאם.)

אז האם אכלתי עוגה עם הקפה? לא ממש! ר’ והילדים חיסלו אותה עוד לפני שרתח הקומקום! (כן, הם אכלו צהריים – העוגה פשוט הייתה מצוינת!)

How To Make A Solar Oven

12 May

I have been thinking about solar cooking for a long time, ever since I found out about it.

Last week I finally found a piece of cardboard large enough to make a solar cooker according to these plans from solarcooking.org

So yesterday, after I had finally finished planting my garden, and had run out of plastic bags for a carpet I’m making (more on that to come) I decided it was time to make my Cookit. Solar cooking .org has a pretty detailed layout, both in metric and inches, though the inches are easier to go by in this case and your result will be more accurate (the grid under the layout plan is by inches).

Anyway, I don’t have inch rulers, so I had to calculate the measurements when not clearly stated in centimeters, which was a bit of a pain.

While measuring cutting and measuring again, I also had to contend with our local lion, which deemed the cardboard, the ruler, the exacto knife and everything else worthy of battle.


This slideshow requires JavaScript.

I will not go into the whole process of making it – the instructions on solar cooking org are quite clear but I will offer a few tips.

1. make sure your cardboard is flat. Mine got warped from being outside in the dew and the sun for a few days, so I had to take time to flatten it first (if it’s warped, the sun won’t bounce of it in the right direction)

2. Unlike me, take time to glue the aluminum foil on properly. As I was making it, I realized that I was being a bit lax with it. If the foil isn’t glued on properly it will have a marked effect on how long the solar oven lasts.

3. Have wipes handy and close.

4. I don’t know why, but my foil, crinkled after I had glued it. I was fine when I left it yesterday afternoon, but when I came to check on it and put it into action this morning, the foil was a bit crinkly. I am sure this is not a good thing, and will have an effect on how well it reflects the sun and what direction it sends the rays, but the extent of the effect remains to be seen.

Another problem I had was finding a cooky bag big enough to hold my pot, (which is not a very big pot). I am sure that if I search the internet hard and long I will be able to find some for purchase, but since I  am impatient to start solar cooking, I just took a couple of the oven bags I had on hand, opened them up and sewed time into a double sized bag. Once again, the needle pricks might make this less efficient than a factory made bag, but it seems to me that the effect will be minimal.

As I write this post, my cake, is busy baking in the sun…..Stay tuned to see if it baked well!

Also, while you are biting your nails in suspense, waiting to see if this worked or not, check out Julies solar box cooker.   I might  give that one a try too.

Anyone got a good source for slow cooking recipes?

איך להכין תנור סולארי

12 May

מאז שלמדתי על בישול סולרי אני מתה לנסות.

השבוע, סוף סוף מצאתי קרטון מספיק גדול כדי להכין ממנו תנור סולארי לפי התכוניות של solar cooking.org

אתמול, כשסוף סוף גמרתי לשתול את הגינה, ונגמרו לי שקיות הניילון עבור שטיח אותו אני מכינה (על זה יסופר בימים הקרובים) החלטתי שהגיע הזמן להכין את התנור הסולרי, הידוע גם בשם קוקיט cookit באתר הזה יש תוכנית די מפורטת גם בס”מ וגם באינצ’ים. אם יש לכם סרגל אינצ’ים, עדיף להשתמש בו הפעם, היות והגריד עליו בנוי התוכנית הוא באינצ’ים ומאלץ את אנשי הסנטימטרים לשלוף מחשבונים כל דקה בערך.

בכל מקרה, לי אין סרגל אינצ’ים, ומצאתי את עצמי שולפת מחשבון כל שנייה ורבע, ואם זה לא מספיק מאתגר, נאלצתי להתמודד אם האריה השכונתי שלנו, שראה בקרטון, בסרגל, בעט ובסכין אויבים אותם יש להשמיד…


This slideshow requires JavaScript.

אני לא אכנס לכל תהליך ההכנה, היות התוכניות די ברורות אבל כן אציע כמה עיצות:

 וודאו שהקרטון שלכם שטוח. שלי התעוות כי השארתי אותו בחוץ בטל ובשמש כמה ימים והייתי צריכה להשקיע זמן בלשטח אותו. (אם הוא לא שטוח, הוא ישקף את קרני השמש והחום לכיוון הלא נכון).

שלא כמוני, וודאו שאתם מדביקים את נייר האלומיניום כמו שצריך. אם הוא לא מודבק כמו שצריך הוא יקרע יותר בקלות והקוקיט שלכם יחזיק מעמד פחות זמן.

וודאו שיש בקרבתכם חבילת מגבונים.

אני לא בטוחה למה זה קרה, אבל נייר האלומיניום שלי התקמט קצת לאחר ההדבקה. אני בטוחה שיהיה לזה השפעה על איך השמש משתקפת. אני לא בטוחה אם זה קריטי או לא.

עוד דבר, לא מצאתי שקיות קוקי מספיק גדולות כדי להכניס לתוכם את הסיר שלי. אני בטוחה שאם הייתי מתאמצת הייתי מוצאת משהו מתאים באינטרנט, אבל אין לי סבלנות לחכות. זה נראה לי מסובך מדי ומסורבל, וגם לזה אין לי סבלנות, אז פתחתי שתי שקיות קוקי רגילות ותפרתי מהן שקית גדולה יותר.

יכול להיות שהנקבים של המחט יפריעו מעט וייתנו לאוויר החם לברוח מהכיס שהשקית יוצרת, אבל לא נראה לי שזה משמעותי מאוד.

בכל מקרה, בזמן שאני כותבת מילים אלה, העוגה שלי אופה לה בנחת בשמש…..

תחזרו בקרוב לראות את התוצאה.

בינתיים תקפצו לבלוג של ג’ולי. היא הכינה תנור סולארי אחר משלי שאולי גם אתו אנסה.

בינתיים – מישהו מכיר מקום טוב למצוא בו מתכונים לבישול איטי?

Paper Mache Planter

28 Apr

A long time ago, back in the dark of winter, I wrote a post called How To Make A Paper Mache Light Fitting – Part 1 and never wrote part 2.

Don’t get all excited – I am still not writing part 2, but I have finally found a use for at least one of the paper mache spheres that I made way back when.

If you read this blog with any regularity, you know that since the beginning of spring I have been on a garden kick. I have sown seeds, and will soon be planting a vegetable garden, I have finally fixed some old garden chairs I plucked from a dumpster and I have a 2do list as long as my arm as far as outdoor, spring / summer projects go.

Anyway, I also find myself wading into the studio every time I want to get something or god forbid actually make some work, and something needs to to be done about making some space for me.

I have already gotten rid of all the cardboard I collected to make cardboard furniture – my space is just to small and my kids to curious for me to be doing that right now (that is kind of unfortunate, because now that I don’t have it anymore, I need a big strong piece for the solar oven I need to build but can’t find anything but small and or flimsy). Even so, I still have a pile of unfinished and ‘halfway’ projects, and something needs to be done about it.

Although I was stumped as to how to make the paper mache spheres into light fittings to my liking, I do love the forms, and how imperfect they are.

I decided that I would transform one of the larger ones into a planter, and carry on dressing up my front porch, turning it into a pleasant place to have a cup of coffee.


This slideshow requires JavaScript.

I had a lavender plant looking for a home and I thought it was the perfect combination.

I didn’t want to paint the sphere in just one block of color – I wanted to experiment and create some more interest so before priming it, I taped a line of masking tape around it and primed and painted only bellow that line.

Since the chairs are definitely present in their bright purple, the sphere needed to be a quieter color. I mixed a quiet bluish gray that complimented it and would also compliment the lavender plant.

I gave it 3 layers of polyurethane to water proof it, so that it wouldn’t melt into a pile of mush leaving the lavender homeless once again.

Just before I planted the lavender I decided to do a little test run to see what would have happened if I had decided to use it as a light shade. In the background you can see a fitting I made out of plastic cups which I never posted about here.

So what do you think – does it work as a light fitting?

עציץ עיסת נייר

28 Apr

לפני די הרבה זמן, במעמקי החורף כתבתי פוסט בשם ‘איך להכין אהיל מעיסת נייר – חלק ראשון‘ ומעולם לא כתבתי את  החלק השני.

גם עכשיו אינני עומדת לכתוב אותו, אבל כן מצאתי שימוש לפחות לאחד מכדורי עיסת הנייר, שהכנתי בזמנו.

 אם אתם קוראים את הבלוג שלי בתדירות, בוודאי אתם יודעים שמאז שהאביב נמצא במקומותינו, אני בשגעת גינה.

זרעתי זרעים ובקרוב אשתול את גן הירק שלי. גם תיקנתי כסאות גינה מעץ, שמצאתי ליד איזה פח ויש לי רשימה באורך הגלות של דברים נוספים אותם עלי להכין לגינתי.

 בכל מקרה, אני  מוצאת את עצמי מפלסת דרך לתוך הסטודיו כל פעם שאני צריכה דבר מה או חלילה רוצה לעבוד שם, וצריך היה לעשות מעשה כדי לפנות לעצמי מקום.

כבר נפטרתי מכל הקרטונים הנפלאים שנועדו להכנת רהיטים, היות ויש לי מעט מדי מקום ויותר מדי ילדים סקרנים (די מצער – כי עכשיו, כשאני צריכה קרטון גדול לתנור הסולרי – אין בנמצא…) ובכל זאת הסטודיו מפוצץ בפרוייקטים חצי גמורים, כך שהחלטתי לפעול.

 למרות שלא כלכך ידעתי איך להפוך את כדורי הנייר שלי לאהילים משביעי רצון, בכל זאת מאוד אהבתי אותם בחוסר השלמות שלהם והחלטתי להפוך את הגדול מביניהם לעציץ, כדי להוסיף לפינת הישיבה המתהווה בדק שבקדמת הבית.


This slideshow requires JavaScript.

היה לי שתיל לבנדר שרציתי לשים בפינה הזאת כך שהכדור השתלב לי בתוכית לחלוטין.

לא רציתי לצבוע את הכדור בצבע אחד בלבד. כדי להוסיף עניין הדבקתי מסקינג טייפ מסביבו וצבעתי רק מתחתו.

כמובן שצבעתי קודם בצבע יסוך ורק אח”כ בצבע אקריליק. רציתי צבע שקט כדי שלא יתחרה עם הכיסאות המאוד סגולים שלי וכך הוחלט על צבע תכלת אפרפר.

 בנוסף לצבע יסוד ולצבע עצמו הוספתי עוד שלוש שכבות של פוליוריטן לאיטום, כדי שכשאשקה אותו, הכדור לא יתמוסס לתוך ערמת עיסה.

 ממש לפני ששתלתי את הלבנדר, החלטתי לנסות ולראות מה היה קורה אם הייתי משתמשת בכדור כאהיל. ברקע אפשר לראות את האהיל שעשיתי מכוסות פלסטיק, עליו לא כתבתי.

מה אתם חושבים – זה היה עובד בתור אהיל?