Tag Archives: newspaper

Paper Mache Planter

28 Apr

A long time ago, back in the dark of winter, I wrote a post called How To Make A Paper Mache Light Fitting – Part 1 and never wrote part 2.

Don’t get all excited – I am still not writing part 2, but I have finally found a use for at least one of the paper mache spheres that I made way back when.

If you read this blog with any regularity, you know that since the beginning of spring I have been on a garden kick. I have sown seeds, and will soon be planting a vegetable garden, I have finally fixed some old garden chairs I plucked from a dumpster and I have a 2do list as long as my arm as far as outdoor, spring / summer projects go.

Anyway, I also find myself wading into the studio every time I want to get something or god forbid actually make some work, and something needs to to be done about making some space for me.

I have already gotten rid of all the cardboard I collected to make cardboard furniture – my space is just to small and my kids to curious for me to be doing that right now (that is kind of unfortunate, because now that I don’t have it anymore, I need a big strong piece for the solar oven I need to build but can’t find anything but small and or flimsy). Even so, I still have a pile of unfinished and ‘halfway’ projects, and something needs to be done about it.

Although I was stumped as to how to make the paper mache spheres into light fittings to my liking, I do love the forms, and how imperfect they are.

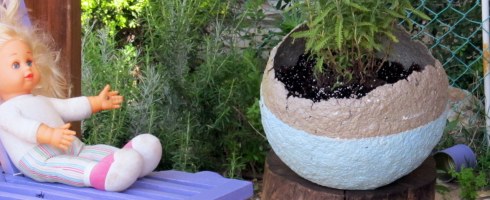
I decided that I would transform one of the larger ones into a planter, and carry on dressing up my front porch, turning it into a pleasant place to have a cup of coffee.


This slideshow requires JavaScript.

I had a lavender plant looking for a home and I thought it was the perfect combination.

I didn’t want to paint the sphere in just one block of color – I wanted to experiment and create some more interest so before priming it, I taped a line of masking tape around it and primed and painted only bellow that line.

Since the chairs are definitely present in their bright purple, the sphere needed to be a quieter color. I mixed a quiet bluish gray that complimented it and would also compliment the lavender plant.

I gave it 3 layers of polyurethane to water proof it, so that it wouldn’t melt into a pile of mush leaving the lavender homeless once again.

Just before I planted the lavender I decided to do a little test run to see what would have happened if I had decided to use it as a light shade. In the background you can see a fitting I made out of plastic cups which I never posted about here.

So what do you think – does it work as a light fitting?

How to Make Origami Planting Pots

1 Apr

Origami starting pots I made last fall. This time I made them much smaller, large enough for just one seed each.

Another week has flown by, with no camera and therefore no posts.

Contrary to my blog, I am actually very busy, with the kids on Pass Over holiday for no less than 3.5 weeks (Pass Over is only 1 week long….), work, getting the garden going and doing various projects…

Most of my time and effort is being spent on all things garden, which I don’t intend to go into to much here, since I am still trying to keep this blog topic oriented, but I will right about my garden as far as recycling and upcycling goes.

Even thought I would like to show you my own preparations, I can’t since I haven’t managed to get my hands on a working camera, (although a friend of mine did lend me one, it doesn’t work LOL).

Last fall I came across this video of how to make seed starting containers Origami style. I made them as instructed in the video, and thought they were absolutely fantastic, although slightly big for planting one seed in, and then transferring to the garden.

This year, I decided to make a smaller version, and instead of using a whole sheet of newspaper, I used half a sheet (of magazine section size) and made myself containers that are perfect for planting one seed. I made about 100. Although I love them if you intend to plant a lot of seeds, and didn’t start making them in the dark of winter, you might find, like I did, that it was a bit to time consuming.

So to my slew of origami starting packs I added as many egg package containers that I could find. When I could find enough of those I started improvising with the other side of the egg container, dividing it into 12 or 18 areas with partitions made from cereal boxes, much like the partitions you would find in the box you would by wine glasses in.

I must have close to 300 seeds planted, and I have a feeling that I have over done it relative to the space I have available.

Other stuff going on:

  • Fixing up some old wooden folding chairs I found. They are falling apart and I will be happy to make them pretty and have them last for a couple of years.
  • Making window boxes out of tin cans.

How To Make A Paper Mache Light Fitting – Part 1

1 Jan

Today, as I was rushing out the door to pick up the kids, I caught a glimpse of my studio and this is what I saw:


It filled me with joy. It’s not as if I have actually finished a piece or that there is anything to show off, but is its quite clear that in this tiny tiny room, work is being done.

What you can’t see here is the piles that are all over the place.

There are piles of newspaper, of plastic bags and of half ready materials. A lot of my time is spending moving piles from one spot to another, but that is not what I wanted to talk about today.

Today I wanted to talk about Paper Mache.

I think I have already mentioned that one of the things that bothers me most about my house, is that I don’t have a single light fitting in the entire house. All we have is bare light bulbs.

The bareness of the light bulbs makes this house feel very temporary. It has reached the point that any material is, as far as I am concerned, a potential light fitting.

A while ago, while surfing the net I ran into some instruction for making light fittings out of Paper Mache pulp using beach balls as a mold. The instructions where removed so I can’t link to them, and since I had a Paper Mache outbreak a couple of years ago,  although I am no specialist, I was able to figure it out without the instructions.

I made the pulp out of the newspaper sticks I had disqualified, and the first batch was exactly enough for one big beach ball.

Newspaper Soup

Newspaper soup

Making the pulp is a pretty easy:

 Cut/tear newspaper into small pieces and soak in water over night.

  1. Boil the newspapers for about half an hour, when you are ready to start working.
  2. Pour out the dirty water, exchanging it with clean water.
  3. Pull out the blender, and start blending the newspaper with large quantities of water.
  4. Strain the blended pulp, squeezing out as much water as possible.
  5. Add glue to the strained pulp. I use wallpaper glue, but there are a few variations to the glue. It’s a matter of personal preference.
  6. Kneed the glue into the pulp till it’s velvety and nice to touch.


I have big eyes, and of course I wouldn’t settle for the small beach balls I had bought. After I inflated one, it seemed to small, so I rushed out to by a regular size beach ball. It seems as if beach balls are the kind of thing that is found in abundance when not needed. When you need one, it’s a whole different story.

Anyway, starting with the big ball was a mistake. I am not sure if the consistency of the pulp was off, or if the thickness of the layer I was using was to blame to, but the big one is the only one out of the three that I have made so far that hasn’t come out near perfect. It cracked and warped all over.


The other two smaller balls were made from another batch of pulp I made, which makes me think it might be the amount of glue that I used on the big one was to blame.

Anyway, I think that both the big ball and the little balls have a  certain coolness to them.

I have always liked to watch as materials changed and mutated as they were worked with. This is seven fold as wonderful when you transform a product into material and then into a different product again.

Although I am quite please with my balls (that doesn’t sound good) I am not going to hang them with their current grayness in my house.

 I am going to make a few more of them and test several finishes out, till I find one that wins me over enough for me to hang a fitting with that finish over my dinning room table.
To be continued.

How To Twine A Placemat Out Of Newpaper, Even If You Have Never Done It Before

26 Dec

It seems as if I am back in the swing of things. A couple of days ago I finished what seems to be my first “placemat”. The inverted comers are there because it doesn’t look like a place mat I would use, and might still be in the realm of classroom crafts. When I complained to R about it he said “well, what do you expect, its not as if you were born twining, learning new things takes time” and I guess he was right.

Learning new skills and techniques take time. This is my second attempt at twining with newspapers, or twining in general. Last time I tried, I found out how important it was for the newspaper sticks to be totally straight. I also thought it would be better to start twining in the middle of the piece by folding a stick in half an alternately going to the left and then to the right.

I think this could be used to create interesting textures, if you alternate the spoke you start on, potentially zigzagging across the piece making interesting textures. I might try that somewhere down the road.

The next piece I try I will work from one end to the other and see if I can make everything square out a bit more.

Even though I measured equal distances for my stakes, somehow, while working,  they didn’t stay parallel, especially the external ones, and I started getting a  trapeze shaped piece instead of a rectangular one.

This would usually be enough to send me running away, screaming and pulling my hair out, but as R said, learning is a process, and funky shaped pieces is part of that.

 After I saw things were getting a bit out of shape I decided to do a “keeper line”, kind of a boarder that would go around my piece and catch the ends of the twining at the end of each row. In that way, I thought, I could also stop the stakes from moving sideways and widening the trapeze. It did help a bit.

One think is for sure, on the next piece I make, I will make sure to slide my ruler down as I work and keep squaring out the distances between the stakes. Wobbly and crooked is ok if that is what you want, but it wasn’t what I wanted at all in this case.

Finishing the piece is something I haven’t quite worked out yet.  I weaved the stakes back into the plastic I twined around, and it doesn’t look to bad. If there wasn’t a color difference, then it would have been perfect. I am not too happy with then ends of the cross twines.

All I did was chop them off at the ends, after twinning them together with the yellow plastic bags. I thought that the best thing to do in this case would be to sew on a heavy fabric boarder. I will try that in the future, but currently lack both a working sewing machine and heavy fabric.

 I still have to try and coat it with polyurethane to waterproof it, something I am not looking forward to.

 If anyone has any experience with this technique I would love to get some pointers!

Conquering Newspaper Tubes

13 Dec

I am as pleased as punch.

That what happens when you have a great day! I had a great day. I did really well at work, had fun with my kids made a cake, made dinner and conquered making newspapers sticks, or tubes or whatever they are called.

Who would ever believe that a drill and a knitting needle would combine to create magic?

I have tried making these before, but all that happened was that I felt like I had ten thumbs and affirmed my severe dislike for glue.

Sometimes things need to sit a bit. Marinade, if you will. Anyway, these are the base for a tone of different techniques, and endless things can be made with them.

I am finding at this point that I spend more time making materials than actually making stuff. I suppose that is part of upcycling, or this kind of recycling.

Take a product, make a workable material out of it, and turn it into a completely different product.

Fantastic.

To Glue Or Not To Do?

2 Dec

Even though I have been quiet for close to a week, I have been extremely busy, mainly in more and less successful experiments with crocheting plastic bags. I will expand on that next time. Before that, I wanted to tell you about my failed attempts at making some things with news papers. There are two techniques I want to try, on of them is coiling, and the other is a weaving technique from basketry. Both of them require making strips or rolls paper, which in turn requires glue. Once again, for the thousandth time I discovered that I truly do not like glue.

 I have put the newspapers aside for now and am crocheting plastic bags. As I sit crocheting, I wonder How this Master does what he does.

Amazing, don’t you think?

Photo credit creative commons license NSNewsflash