Tag Archives: paper

Paper Mache Planter

28 Apr

A long time ago, back in the dark of winter, I wrote a post called How To Make A Paper Mache Light Fitting – Part 1 and never wrote part 2.

Don’t get all excited – I am still not writing part 2, but I have finally found a use for at least one of the paper mache spheres that I made way back when.

If you read this blog with any regularity, you know that since the beginning of spring I have been on a garden kick. I have sown seeds, and will soon be planting a vegetable garden, I have finally fixed some old garden chairs I plucked from a dumpster and I have a 2do list as long as my arm as far as outdoor, spring / summer projects go.

Anyway, I also find myself wading into the studio every time I want to get something or god forbid actually make some work, and something needs to to be done about making some space for me.

I have already gotten rid of all the cardboard I collected to make cardboard furniture – my space is just to small and my kids to curious for me to be doing that right now (that is kind of unfortunate, because now that I don’t have it anymore, I need a big strong piece for the solar oven I need to build but can’t find anything but small and or flimsy). Even so, I still have a pile of unfinished and ‘halfway’ projects, and something needs to be done about it.

Although I was stumped as to how to make the paper mache spheres into light fittings to my liking, I do love the forms, and how imperfect they are.

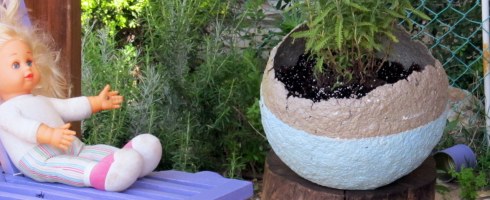
I decided that I would transform one of the larger ones into a planter, and carry on dressing up my front porch, turning it into a pleasant place to have a cup of coffee.


This slideshow requires JavaScript.

I had a lavender plant looking for a home and I thought it was the perfect combination.

I didn’t want to paint the sphere in just one block of color – I wanted to experiment and create some more interest so before priming it, I taped a line of masking tape around it and primed and painted only bellow that line.

Since the chairs are definitely present in their bright purple, the sphere needed to be a quieter color. I mixed a quiet bluish gray that complimented it and would also compliment the lavender plant.

I gave it 3 layers of polyurethane to water proof it, so that it wouldn’t melt into a pile of mush leaving the lavender homeless once again.

Just before I planted the lavender I decided to do a little test run to see what would have happened if I had decided to use it as a light shade. In the background you can see a fitting I made out of plastic cups which I never posted about here.

So what do you think – does it work as a light fitting?

How To Make a Paper Shell Chandelier

14 Feb

fauz capiz shell chandelier

If you have been following me, you know that on my 2012 list of things to make I have several light fittings, since we don’t have any at all in our house. I have started a couple out of paper mache, and have left them for a bit to think about how I want to proceed. I have a few other ideas running around in my head, one of them Is this faux capiz shell chandelier, and chances are the first blog to feature them was Design sponge. These seem remarkable simple to make, so simple its nearly silly, and I marked it in my head as something that would look great in our bedroom.

For the base you can use an old lamp shade or planter basket (which is what I did) and the shells are made of several layers of wax paper, ironed together.


I used ovals instead of circles, and initially tried adding some glitter in between the layers of wax paper, but decided to pass on that since it prevented the wax paper from adhering properly.

 Although, as I said before, this is so simple it’s nearly silly, I still managed to get myself into all sorts of trouble, mainly by neglecting to see how far the end of bulb was from the ceiling, only to discover that “not far enough” was a pretty accurate description…. I only found this out while single handedly attempting to hang it from my ceiling. I ended up having to cut out the center of the basket, to allow the bulb to hang through, but now might just have a fire hazard on my hands since it is really close to the paper. I will probably shop for some kind of hardware that will allow the light to sit right on the ceiling, thus avoid burning my house down.

 Other than that, I am quite pleased with it. It softens my bedroom up nicely, and is much nicer to wake up to in the morning than a bare bulb.


There are several ways these can be made, and it worth while searching a bit and choosing the way that suits you best.

 This is what I did:

  •  I started of by ironing 4 layers of wax paper together. I sandwiched them in between parchment paper, to keep the iron clean.   (I did this many times, maybe 50)

  • Using a stencil oval cutter, I cut out 1000 ovals (yeah, I know….) out of which I ended up using probably about 950.  To minimize the work, try and see how many pages you can cut through at once. I found that 3 was fine, four was pushing it, so for most of the time I cut in piles of 3 (after it occurred to me that it’s insane to cut each oval on its own).


  • A lot of people use hot glue to make the strips of circles/ovals. I am not a glue fan so chose to sew the strips. I made sure to overlap the ovals a bit, except between the two first ovals, where I left a tiny space. When attaching the strip to the basket, I just folded that little space over the basket wire, so that I have one oval on the inner side of the basket. I attaché the thread to the basket wire with a bead of hot glue.


  • When you sew or glue your strips together, start by counting out your ovals/circles into groups. I used a muffin tin (two, in fact). It streamlines the work.


  • Use the longest stitch on the sewing machine. To avoid tearing the paper.


  • Work from the inside out. It’s a good Idea to sew or connect your strips for the first tier, and figure out how long you want the next row to be. My inner circle has 11 ovals on each strip (one folded over), then 2 rows of 8 and one row of 6.
  •  While working on it, I had it suspended between the backs of two chairs.
  •  I attached mine to the ceiling with two small hooks.

Now, other than the chandelier, I have a pile of thick wax paper sandwiches with oval cutouts. I wonder what I can do with them? Any Ideas?