After the complete tedium of the no go fabric/ plastic rugs, I needed a quick and easy for my soul to regain the feeling of accomplishment and control.
I had been saving plastic bottles for another project I had in mind, but since we have a collection center for plastic bottles near by, and they really are easy to come by in largish quantities, I decided to sacrifice 6 of them for my quick and easy.
The concept is the same as with my tuna can hooks except it is even faster and easier to do, and it has the added advantage of permanently removing some of the never-played-with little knick-knacks off the ever growing pile of toys on the floor. No doubt and all around win-win situation.
This slideshow requires JavaScript.
Making them is very easy. Just cut of the top of the bottle, leaving at least 2 inches and a tab you can use to hang it from, with a screw or nail, (depending what you will be using them for), Collect all the knick- knacks you need and go wild.
A few points to ponder:
Design wise the sky is the limit.
Because of the star shaped bottom most soda bottles have, it is a bit hard to see the details of the design face on. Make sure the sides look good too.
The deeper you make it, the easier it will be to hang stuff on it. As opposed to the tuna cans, the edges on the bottles are curved, so for some things to hang well and not slip off you might need some depth.
I don’t expect these to last as long as the tuna can hooks. Plastic is softer and weaker and it will probably break if abused to much.
I don’t think that that is necessarily a bad thing when it comes to décor in kids rooms.
Anyway, the kids love them, and I love the fact that they were quick and easy, with both a start and a finish.
Its been a while since I put pen to paper (literally). In fact, other than the odd check or weekly supermarket lists, its been years.
It will probably happen with greater frequency over the course of the summer as I sit by the pool, amidst the screams and splashes of joyous kids, while my kids frolic in the water.
I haven’t written a post in quite a while, not because I have been slacking, on the contrary. The pile of unfinished projects in the corner of the studio is growing just as fast as the materials needed to complete them is dwindling, once again proving the point that the value we assign objects is subjective and subject to change at any given moment.
One moment they are shopping bags stuffed listlessly, and guiltily under the sink and in the next they are a valuable material that has been totally used up, every last one pull out of every nook and cranny in the house, and I still find myself about 500 short of completing the carpet. Into the corner goes the half finished carpet and while I wait for the bags to multiply once again and out come the chairs from my old shop that I need to reupholster, and the pile of jeans I intend to use to do so. Once again the amount of jeans I had set aside for the project fell just short of what I needed to complete the fabric for the chairs, and they too joined the pile in the corner.
Out came to old, torn, ugly sheets, soon to be place mats and carpets and once again, all to soon they find themselves half finished in the corner.
I have been upcycling quite intensively for just over 6 months now, and something needs to change in the way I am working. I need to find a way to source materials in decent quantities, for free, so that I can work a project, or a series from beginning to end without having to wait till I grow to fat or to thin for my current pairs of jeans. It would be wonderful if all of this could happen for free.
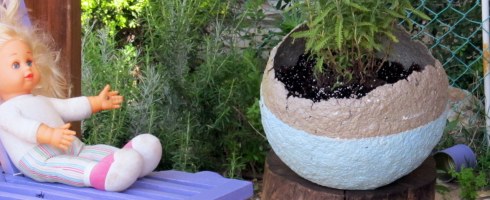
Don’t get all excited – I am still not writing part 2, but I have finally found a use for at least one of the paper mache spheres that I made way back when.
If you read this blog with any regularity, you know that since the beginning of spring I have been on a garden kick. I have sown seeds, and will soon be planting a vegetable garden, I have finally fixed some old garden chairs I plucked from a dumpster and I have a 2do list as long as my arm as far as outdoor, spring / summer projects go.
Anyway, I also find myself wading into the studio every time I want to get something or god forbid actually make some work, and something needs to to be done about making some space for me.
I have already gotten rid of all the cardboard I collected to make cardboard furniture – my space is just to small and my kids to curious for me to be doing that right now (that is kind of unfortunate, because now that I don’t have it anymore, I need a big strong piece for the solar oven I need to build but can’t find anything but small and or flimsy). Even so, I still have a pile of unfinished and ‘halfway’ projects, and something needs to be done about it.
Although I was stumped as to how to make the paper mache spheres into light fittings to my liking, I do love the forms, and how imperfect they are.
I decided that I would transform one of the larger ones into a planter, and carry on dressing up my front porch, turning it into a pleasant place to have a cup of coffee.
This slideshow requires JavaScript.
I had a lavender plant looking for a home and I thought it was the perfect combination.
I didn’t want to paint the sphere in just one block of color – I wanted to experiment and create some more interest so before priming it, I taped a line of masking tape around it and primed and painted only bellow that line.
Since the chairs are definitely present in their bright purple, the sphere needed to be a quieter color. I mixed a quiet bluish gray that complimented it and would also compliment the lavender plant.
I gave it 3 layers of polyurethane to water proof it, so that it wouldn’t melt into a pile of mush leaving the lavender homeless once again.
Just before I planted the lavender I decided to do a little test run to see what would have happened if I had decided to use it as a light shade. In the background you can see a fitting I made out of plastic cups which I never posted about here.
So what do you think – does it work as a light fitting?
When I talk about the relationship we have with objects, the disrespect we have for materials and work invested in making them into objects, I am not talking about this:
This should become a religion, using things as they were intended and in about 30 other ways per thing.
I am on a purple kick. I haven’t been on one of those since I was 19 or 20 years old. I painted one of my walls deep purple and loved it. On the wall next to that one I had a stripped piece of fabric in blues and greens hanging on the wall behind an aquarium which had nothing but water plants in it. It was beautiful. I was young and it was all about having fun. Of course I don’t have a digital picture of back then, but I can just picture a bunch of us on my bed, wearing sunglasses and drinking beer because we were cool, and it was the 80’s!
Then I went off purple for a very long time.
Couldn’t stand it.
Didn’t get it.
And for about a quarter of a century (yes, that long!) I would have nothing to do with it.
It must be a mid life crisis of sorts, because now I am completely into purple again.
I am not wearing it, and don’t have purple walls inside my house, but have painted (or am painting to be more accurate) some wooden garden chairs which I saved from trash the exact same shade of purple my wall from all those many years ago was.
This slideshow requires JavaScript.
I was painting it in front of my house, where we have some fantastic gazenia’s growing. The are a very dark yellow, almost orange, and when I stood back to look at the newly painted purple chair, which happened to be standing right in front of the gazenia’s it was as perfect as it could possibly be.
The colors looked perfect together and I felt myself literally filling with joy. Way back when, in the age of the purple wall I used to say I felt like Coca-cola, all bubbly and excited inside.
So one thing lead to another, and since I have a lot of seeds started for my summer garden, a window right above my beautiful gazenia’s and a huge collection of tin cans just waiting to be used, I decided to paint some purple and use them as a sort of window box when my flowers are big enough to be transplanted.
That was the plan, but then Passover came along, and I remembered that this too was a time of a year where modern consumerist tradition called for gifts (at pass over gifts for the house are usually given – dishes, hand towels and so on), since I am not much of a consumer I remembered a little late, and decided to use my freshly painted purple tins and to gift my family herbs. It seemed to be a great spring gift, and I knew it would look great. So I picked up some Oregano, Thyme and Taragon at the nursery and planted them in the tin cans. Before I did that, I drilled holes in the bottom of the cans so that the water could drain, and prepared little tags for each one out of a tuna can.
To prepare the tags:
Cut the side strip of the tuna can (you can use any tin can for this).
Flatten it with some light hammering with a raw hid hammer (a rubber mallet would be just as good).
Snip of the corners and fold the edges up. By doing this you both eliminate the danger of being cut by the tin, and also give the tag a nice boarder.
Write the name of the herb with a permanent marker on the tag.
(I play around with embossing the names of the herbs on the tag, but since I don’t have letter punches and it wasn’t looking very good, I decided to leave good enough alone and go with the marker.)
I am usually not 100% happy with things I make, but for some reason, this just seemed to pull together well. The purple, the lovely shades of green the herbs have, along with the cute tabs makes me just about pleased as punch!
Origami starting pots I made last fall. This time I made them much smaller, large enough for just one seed each.
Another week has flown by, with no camera and therefore no posts.
Contrary to my blog, I am actually very busy, with the kids on Pass Over holiday for no less than 3.5 weeks (Pass Over is only 1 week long….), work, getting the garden going and doing various projects…
Most of my time and effort is being spent on all things garden, which I don’t intend to go into to much here, since I am still trying to keep this blog topic oriented, but I will right about my garden as far as recycling and upcycling goes.
Even thought I would like to show you my own preparations, I can’t since I haven’t managed to get my hands on a working camera, (although a friend of mine did lend me one, it doesn’t work LOL).
Last fall I came across this video of how to make seed starting containers Origami style. I made them as instructed in the video, and thought they were absolutely fantastic, although slightly big for planting one seed in, and then transferring to the garden.
This year, I decided to make a smaller version, and instead of using a whole sheet of newspaper, I used half a sheet (of magazine section size) and made myself containers that are perfect for planting one seed. I made about 100. Although I love them if you intend to plant a lot of seeds, and didn’t start making them in the dark of winter, you might find, like I did, that it was a bit to time consuming.
So to my slew of origami starting packs I added as many egg package containers that I could find. When I could find enough of those I started improvising with the other side of the egg container, dividing it into 12 or 18 areas with partitions made from cereal boxes, much like the partitions you would find in the box you would by wine glasses in.
I must have close to 300 seeds planted, and I have a feeling that I have over done it relative to the space I have available.
Other stuff going on:
Fixing up some old wooden folding chairs I found. They are falling apart and I will be happy to make them pretty and have them last for a couple of years.
I have been reading a lot about cardboard furniture, and fantasizing about industrializing the whole process, without even making the tiniest piece of furniture. Not for the lack of trying – I am collecting boxes from here and there, and am finding flaws in the boxes which make them unsuitable for what I want to make. It’s a bit frustrating, and I am sure there is an element of procrastination, do to the fact that I am really quite scared of trying and failing with this.
In the meantime, I am tuna canning again.
This slideshow requires JavaScript.
I have always been a doodle freak, except in the past few years, when the jewelry took over every available grey cell in my brain, and even my doodles were jewelry oriented.
Parallel to writing this blog, I have started a new sketch book, dedicated to finding my doodle again, and it is coming back slowly but surely.
In addition to that, I am enjoying my tuna can coat hooks, and want to make more of them, both because I could use more elsewhere in the house, and also because they would make nice gifts.
Anyway, it seemed like a good time to combine both these activities and I have started doing a series of doodled tuna cans. I did the initial black with an Artline marker, and was going to color it with acrylics, but discovered its harder than it seems, mainly, since I didn’t have a tiny enough brush. Even though I did give one of my brushes a hair cut, it wasn’t as accurate as I needed it to be, and as you can see, I needed to wear my optivisors, a serious throw back to my jewelry days, to be able to hi the right spot with the brush.
I have since purchased a good one, I hope, but have not put it to use yet, instead, I decided I would try the easy way out, and color in with markers.
Although I do like the results, I realize how limited the markers color palate is, and although it’s hard for me to imagine life getting any better than being able to do my art in bed, I will, at least temporarily abandon the markers in favor of my new brush and acrylic paints.
We started spring cleaning since we had a very stormy weekend, and there wasn’t a whole lot else to do. The reason I am sharing this with you is because it became painfully apparent once again, that even if we clean till we are blue in the face it will only take about 5 minutes for some of our rooms will look like a hurricane hit them since we don’t have enough storage space.
Anyway, I started researching cardboard furniture and different methods of making it and will probably try to attempt some larger projects in the near future.
In the mean time, For you viewing pleasure here are 4 links to cool cardboard furniture inspiration:
It’s nice to see larger organizations jumping on the upcycle / re-purpose wagon, and not just individuals. I would love to have a couple of those as coat racks. (If you have been reading here regularly, you know I have a coat rack / hook obsession 🙂
If you grew up in London and were a regular commuter on the Metropolitan Line, you may well remember their high back seats and capacious 1960’s luggage racks with umbrella hooks. When the trains were decommissioned last year the clever folk over at The London Transport Museum decided to rescue the racks, scrub them up and are offering a limited number in three different sizes. Available from March, you can own a little piece of London history in your own home…
What a novel shelving solution! Made from aluminium they are super lightweight but sturdy. Perfect if you need a little extra storage in the hallway or kitchen. Other memorabilia includes a reproduction of the original 1960’s poster that introduced the newly modernised line 50 years ago…
and not sure I’d want to be reminded of the tube this much in my own home, but made to order cushions…
Have you ever wondered where all the lost socks go? I know that I am not the only one who keeps on buying new socks because in some mysterious way, I always end up with a bunch of non related socks.
It’s not as if I was raised or am raising my family to leave one sock outside and throw the other one into the laundry hamper. It’s as if there are casualties if not fatalities in the journey of the socks from our dirty feet to the clean sock draw. I would say that about 40% of the socks never make it back. They just vanish into thin air. Maybe they are kidnapped by a monstrous sock napper that lives in the laundry hamper or maybe they are munched up by a ravenous washing machine or ripped of the clothes line by a stealth sock ripper. Who knows. What ever the case is, their sock spouses need a place to wait hopelessly for them to return from wherever it is they disappeared to, because sometimes they do.
To this purpose, I decided to make a lost sock basket, in which all the lone socks would gather and save us the trouble of digging through piles of single socks in the hopes of finding a pair.
Since I am enjoying the look and the texture of the crochet baskets from plastic bags I decided that this was the route I would take for the lone socks basket, but I wanted to explore other patterns than the one I have been using.
I have an old book that used to belong to my mother called The Complete Book Of Crochet and it is copyright 1946 and the edition I have is from 1972. I was 5 years old when my mother bought this. She made quite a few things out of it, and I remember this book as always being around. It seems appropriate to me that now that my own daughter is 5 years old I use some of the patterns in it. As a matter of fact, I have had it for the past couple of years, and have been dying to make something, but doilies and crochet table clothes, as beautiful as they are seem kind of dated to me. Taking one of the patterns and using it with the much coarser plarn, instead of with delicate, thin cotton seemed the thing to do.
I am not going to copy the entire pattern here, but you can see it on the scan (its # 7722. If you click on the image it will open much larger).
I adapted it to the size I wanted since I was working with a different size plarn than the weight it was originally planned for, the important thing is the sequence of the different crochet stitches. Since I do most of this in the evening, after I have finished all the other things I have to do, my concentration is less than optimal, and I found that I had to pull out just about as much as I crocheted.
For some reason I was surprised with the result was a bit floppy. I am not sure why because it is quite big so it makes sense that it would be. I solved that easily enough with wooden Skewer in all 4 corners. If I wanted it to be a magazine basket instead of a sock basket, I could strengthen the top with skewers too.
Now I want an Idea for something I could make out of a traditional doily pattern. Any thoughts?
If you would like to read it in English, please click on English in the list of categories, and you will see only those posts written in English. (That is when I get round to writing any of them...)
זהו בלוג דו לשוני
על מנת לקרוא את הפוסטים בעברית בלבד, נא בחר את קטגוריית "עברית" מרשימת הקטגוריות.